Ever feel like your AirPods just aren’t loud enough? Sometimes, it’s hard to catch every word in your favorite song or podcast, especially when you’re out and in the crowd. But here’s the good news, there are some quick and easy tricks on how to make airpods louder.
In this guide, we’re gonna walk you through a bunch of simple ways to turn up the volume. Whether you’re using an iPhone, an Android, or even a Mac, we’ve got tips for you. So, let’s dive in and get those AirPods cranked up.
In this article: Show
How to make your AirPods louder hack: Basic Volume Control Tips
For iPhone and iPad:
Sometimes, it’s the simple fixes that make the most difference! Here’s how you can adjust the basic volume controls on your iPhone or iPad to make your AirPods louder:
- Press the Volume Up Button:
- Use the volume buttons on the side of your iPhone or iPad. Make sure you press the up button to maximize the volume.
- Open the Control Center:
- Swipe down from the top-right corner (or swipe up on older models) to access the Control Center.
- Find the volume slider and drag it all the way to the top.
- Check for Silent Mode or Do Not Disturb:
- Flip the mute switch on the side of your iPhone to make sure Silent Mode is off.
- Open the Control Center and ensure the moon icon (Do Not Disturb) isn’t highlighted. These settings can sometimes interfere with sound.
For Mac Users:
Using AirPods with a Mac? Here’s how to adjust the volume for a louder experience:
- Use the Keyboard:
- Press the volume up button on your keyboard (usually found on the top row).
- Adjust from the Menu Bar:
- Click the volume icon in the top-right corner of the screen.
- Slide the volume bar up to the desired level.
These basic controls might seem obvious, but it’s easy to overlook them. Sometimes, a small tweak is all you need to get your AirPods sounding just right!
Note: If your AirPods still sound muffled or too quiet even after these quick hacks, it might be time to consider an upgrade. Some earbuds naturally deliver louder, clearer sound. Here are the best high-end options for a better listening experience.
All products on Beats Insight are chosen by our experts independently, but we may earn a commission on purchases made through our links.
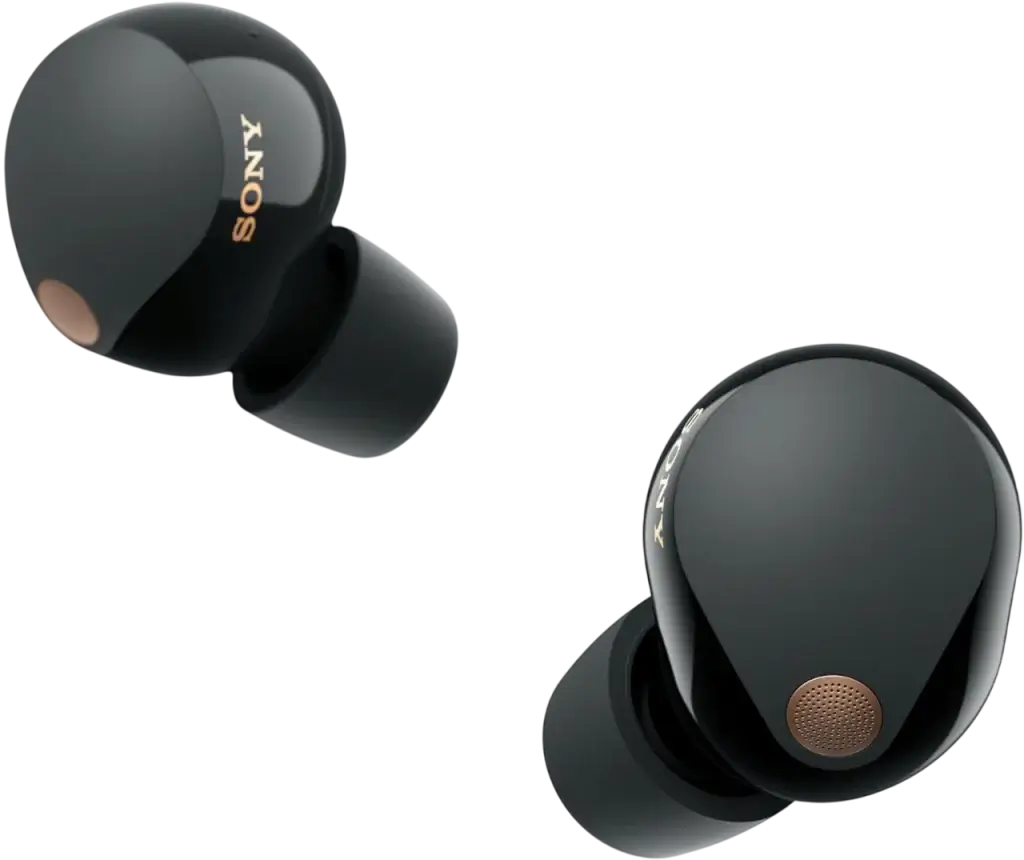
Sony WF-1000XM5
Noise Cancelling Earbuds with Alexa Built-in

Bose QuietComfort Earbuds II
With Personalized Noise Cancellation & Sound
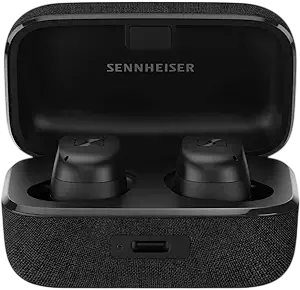
Sennheiser MOMENTUM True Wireless 3
ANC, Multipoint connectivity, IPX4,Qi charging,28-hour Playtime.
How to make Airpods louder on iPhone: Quick Tips
If you’re finding your AirPods a bit too quiet on your iPhone, don’t worry! There are a few simple tricks that can make a big difference. Here are some quick tips to get your AirPods sounding louder in no time:
Check the Volume Limit:
- Open Settings on your iPhone, scroll down to Music, and tap on Volume Limit.
- If it’s not already at max, drag the slider all the way up. This setting often limits your volume without you even realizing it.
Turn Off Sound Check:
- While you’re still in the Music settings, find Sound Check and make sure it’s turned off.
- This feature tries to balance audio levels, but sometimes it can lower the overall sound. Switching it off can give your audio an instant boost.
Use the Control Center:
- Swipe down from the top-right corner of your screen (or up from the bottom if you have an older iPhone) to open the Control Center.
- Check the volume slider here. Sometimes, your iPhone’s physical buttons don’t reflect the actual volume level, so it’s good to double-check.
Disable Low Power Mode:
- Head to Settings > Battery and turn off Low Power Mode. When this mode is on, it might limit some background functions that affect volume and audio quality.
Enable Headphone Accommodations:
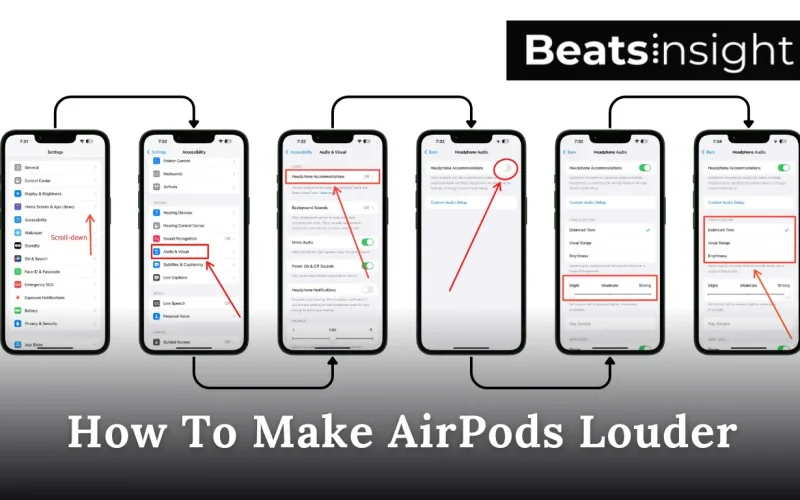
- Go to Settings > Accessibility > Audio/Visual > Headphone Accommodations. Toggle it on.
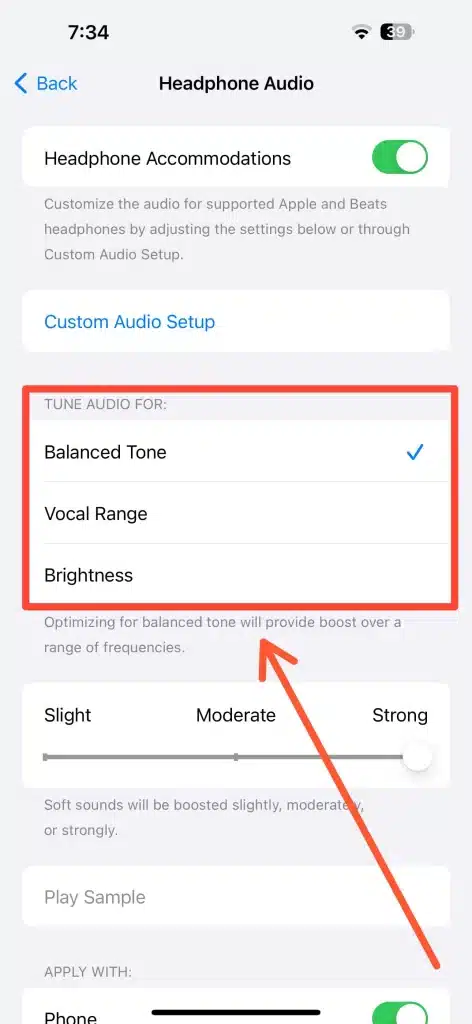
- Adjust the audio settings to Vocal Range and move the slider to Strong for a noticeable volume boost, especially for podcasts or vocal-heavy audio.
These small adjustments can make a big difference in how loud your AirPods sound. Give them a try, and you might be surprised by the results!
If you’re also looking to connect your AirPods to other devices, here’s a guide on how to connect AirPods to your laptop.
How to make Airpods louder on Android: Quick Tips
Now, if you’re curious about how to make AirPods louder on Android, don’t worry, we’ve got some tips for you too!
1. Adjust Volume Levels:
First off, press the volume up button on your phone. But here’s the trick: on many Android phones, there are multiple volume sliders. So, tap the little arrow next to the main slider on your screen, then find Media Volume. Make sure it’s all the way up!
2. Enable Developer Options:
Learn how to Enable Developer Options and Disable Absolute Volume on Android with step-by-step guide:
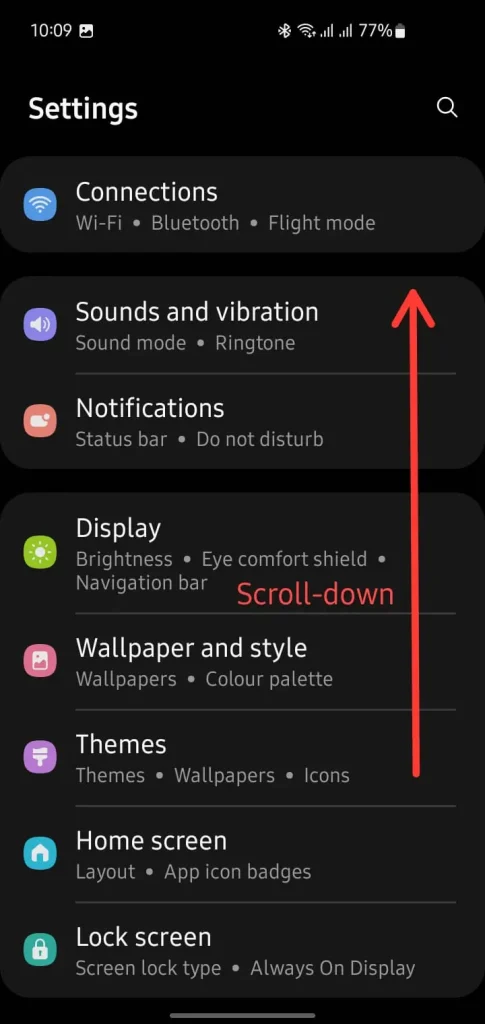
Step 1: Open Settings and Scroll Down
Open the Settings app on your Android device. Scroll down to find additional settings.
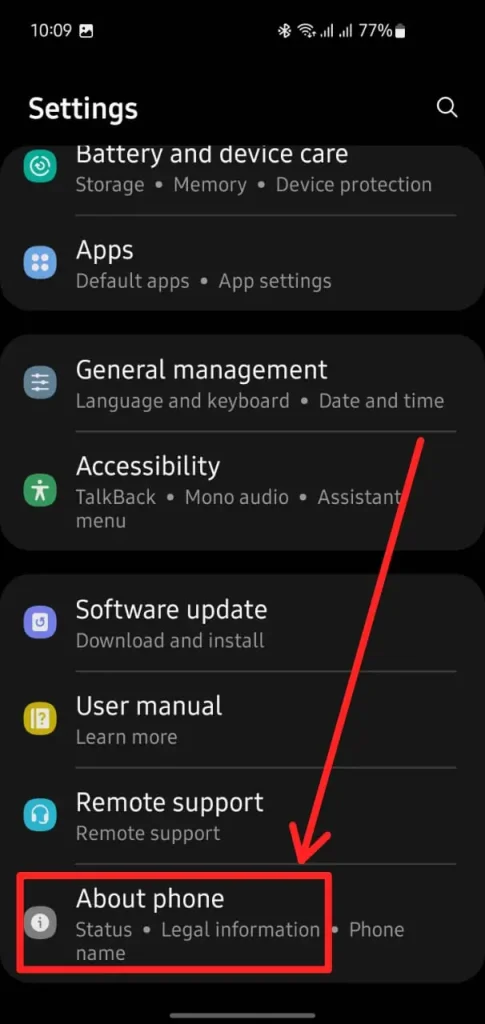
Step 2: Go to About Phone
Keep scrolling in the Settings menu and tap on About phone at the bottom.
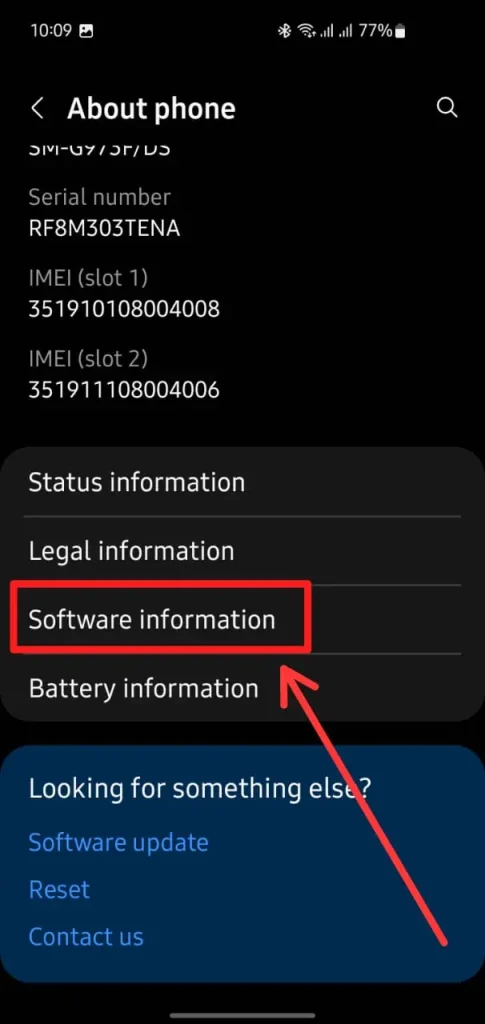
Step 3: Access Software Information
In the About phone section, select Software information to view more details about your device.
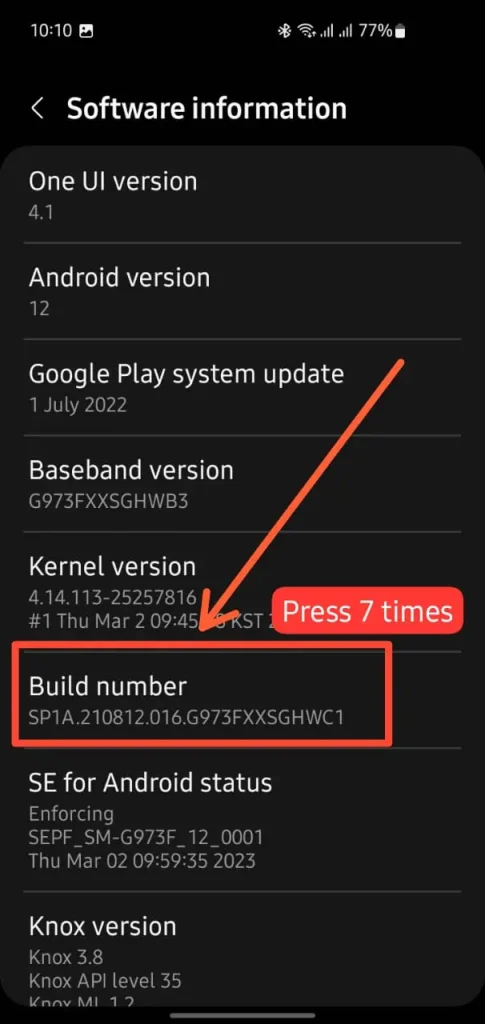
Step 4: Tap on Build Number
In the Software information menu, find Build number and tap on it seven times. You will see a message saying “Developer mode has been enabled.”
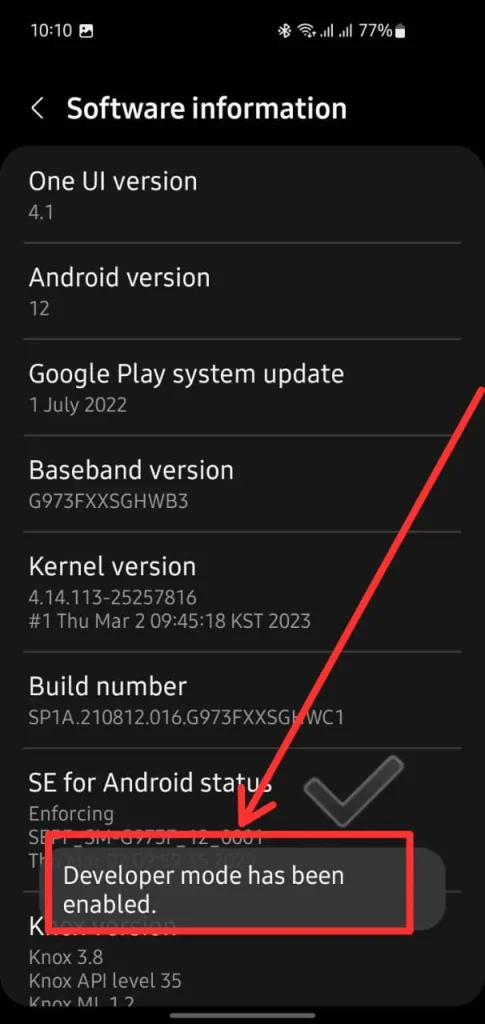
Step 5: Confirm Developer Mode
Once you have tapped on Build number seven times, a message will appear saying that “Developer mode has been enabled.”
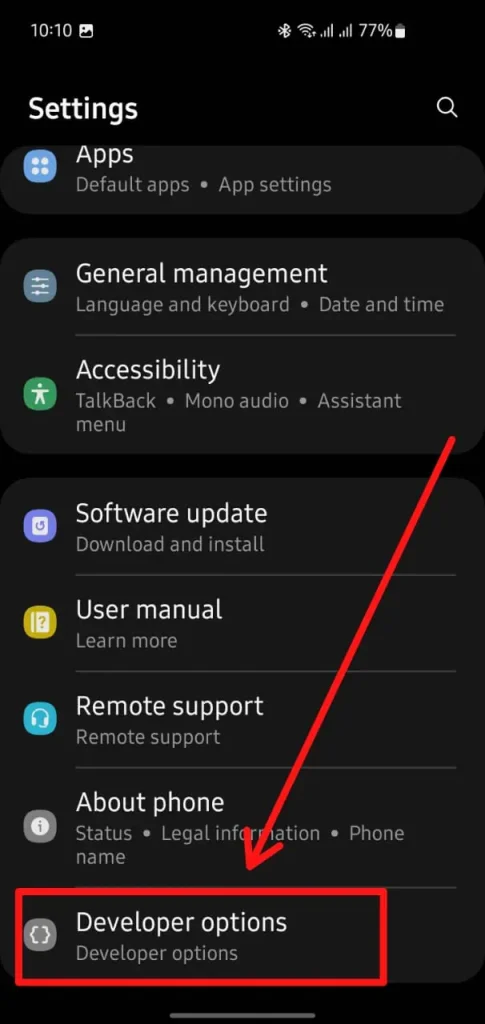
Step 6: Return to Settings and Open Developer Options
After enabling developer mode, go back to the Settings menu. You will now see Developer options available. Tap on it.
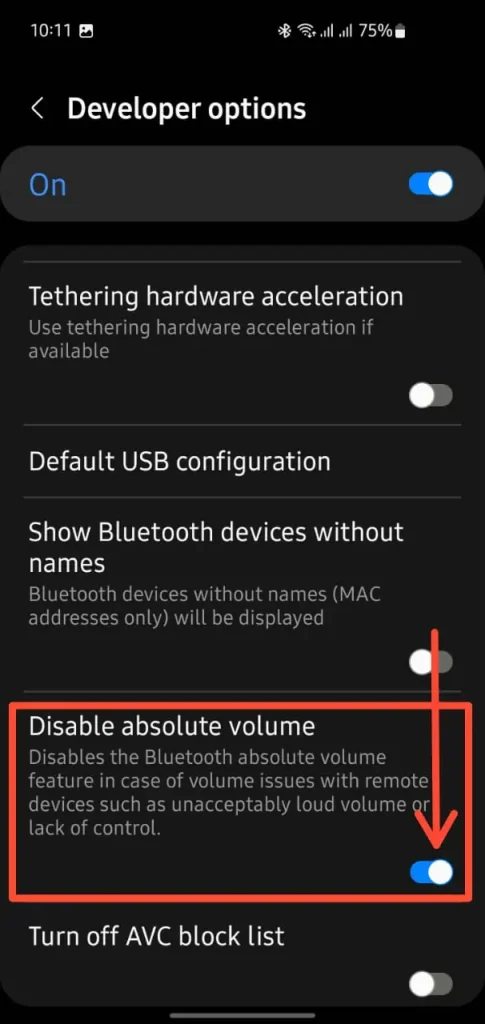
Step 7: Enable Disable Absolute Volume
In the Developer options menu, scroll down and find Disable absolute volume. Toggle this option on. This setting can help resolve volume issues and may boost your Bluetooth audio volume, including your AirPods.
Now, your Bluetooth volume control is separated, allowing for potentially higher audio levels on your connected devices!
3. Use Built-In Equalizers:
Learn how to use the Built-In Equalizer on Android for Louder Sound with Step-by-Step guide:
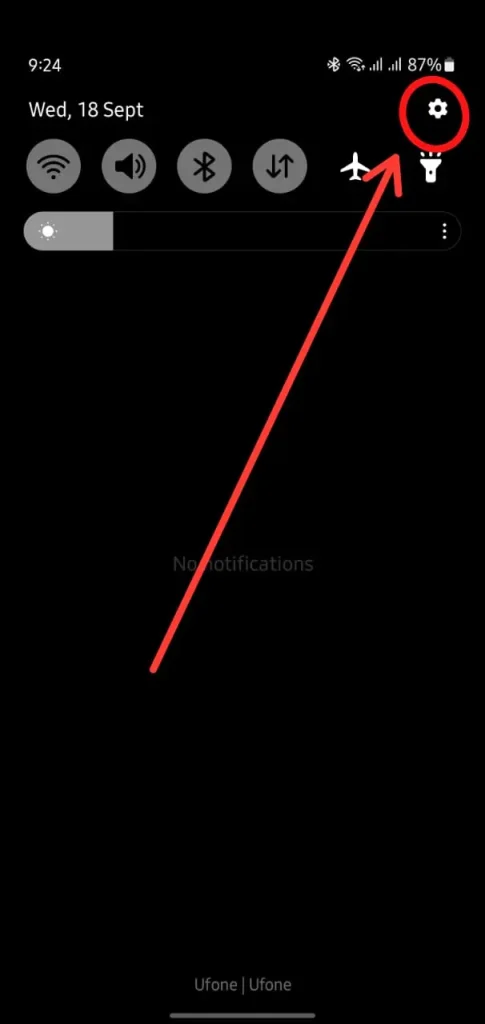
Step 1: Open Quick Settings
Swipe down from the top of your screen to open the quick settings menu. Tap the gear icon in the top-right corner to go to the Settings.
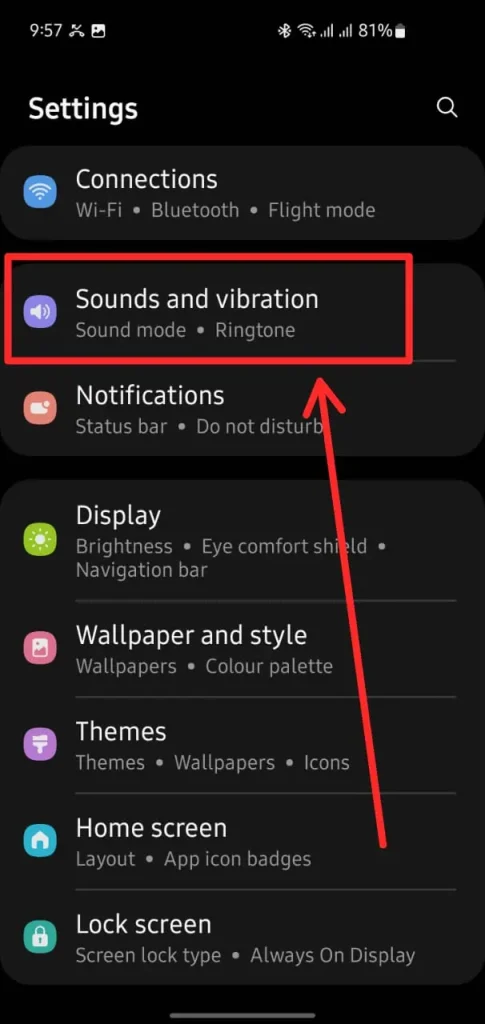
Step 2: Go to Sounds and Vibration
In the Settings menu, scroll down and select Sounds and Vibration.
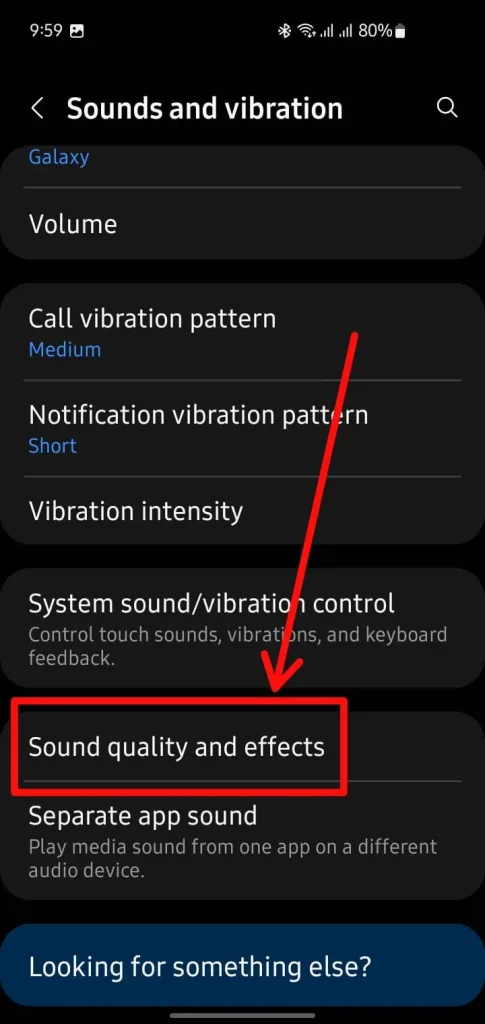
Step 3: Access Sound Quality and Effects
Inside the Sounds and Vibration settings, scroll down and tap on Sound quality and effects.
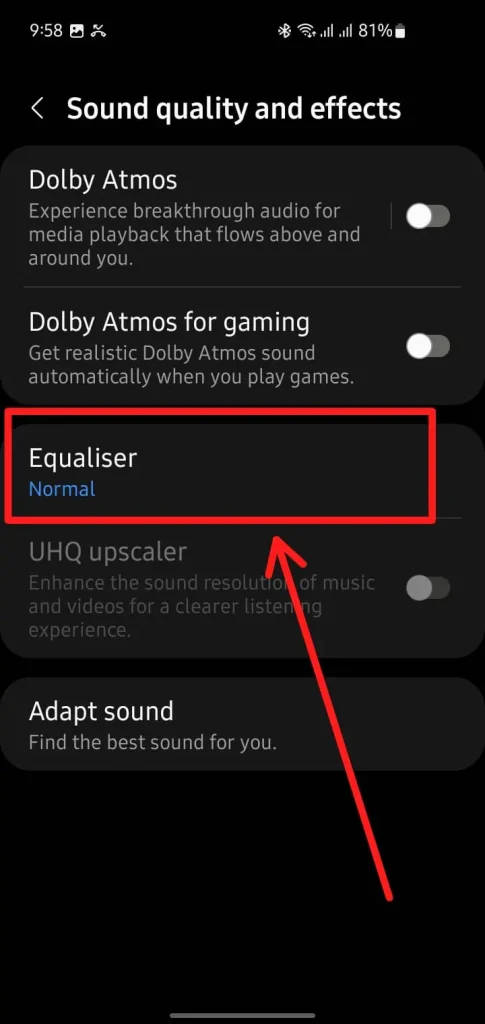
Step 4: Select Equalizer
In the Sound quality and effects menu, find and tap on Equalizer.
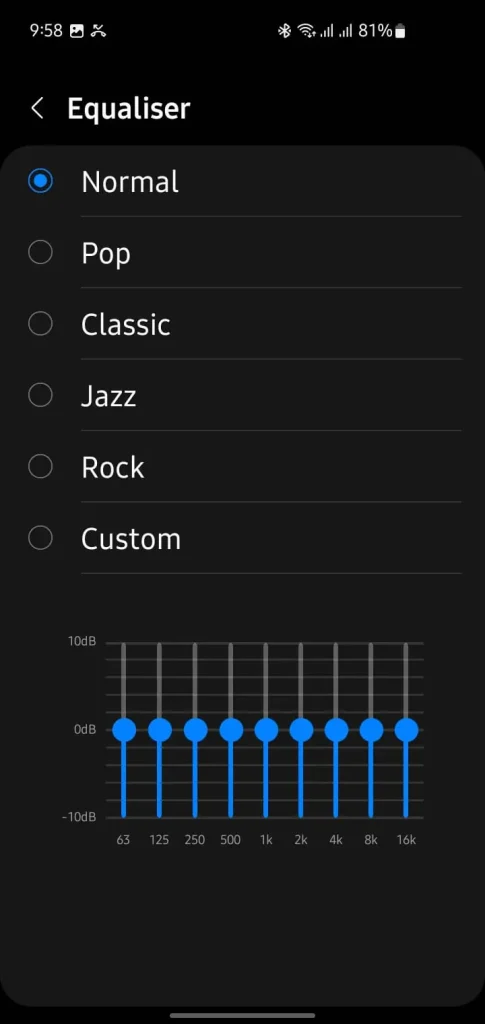
Step 5: Choose an Equalizer Preset
In the Equalizer settings, you can choose from several presets like Normal, Pop, Classic, Jazz, Rock, or create a Custom profile. Adjusting the equalizer to a setting like Rock or Custom can increase the treble and bass, making the audio feel louder.
4. Try a Volume Booster App:
If you’re still not satisfied, there are plenty of volume booster apps on the Play Store. Just be careful with these cranking the volume too high can damage your hearing or your AirPods. Use them wisely, and don’t go overboard!
And there you go! These tips should help you boost the volume on your AirPods, no matter what kind of device you’re using. It’s all about tweaking the right settings to get that perfect sound.
For those using AirPods Max, learn How To Connect Airpods Max To Pc with our detailed guide.
How to make AirPods louder using iPhone’s Accessibility Settings?
To make AirPods louder, go to Settings > Accessibility > Audio/Visual > Headphone Accommodations. Toggle it on and adjust the ‘Tune Audio‘ slider to ‘Strong‘.
Step by Step Guide:
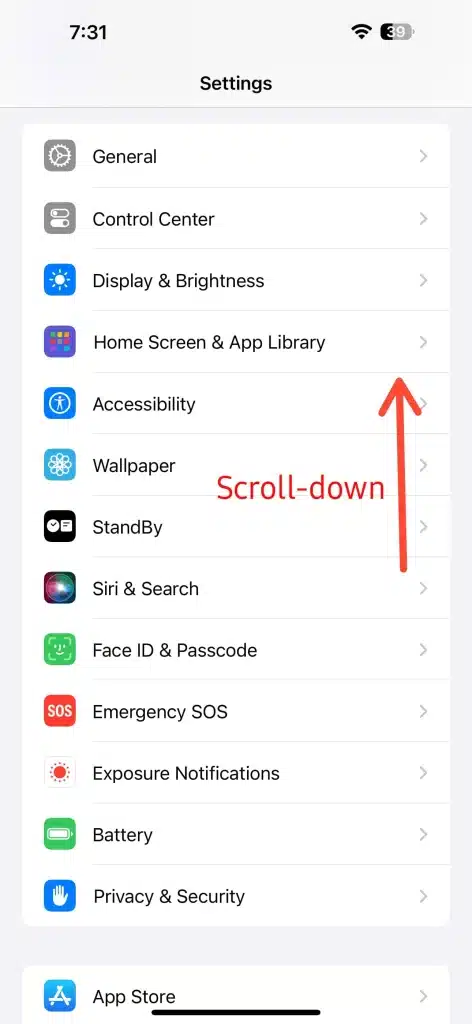
Step 1: Open Settings and Go to Accessibility
Open the Settings app on your iPhone. Scroll down until you see Accessibility.
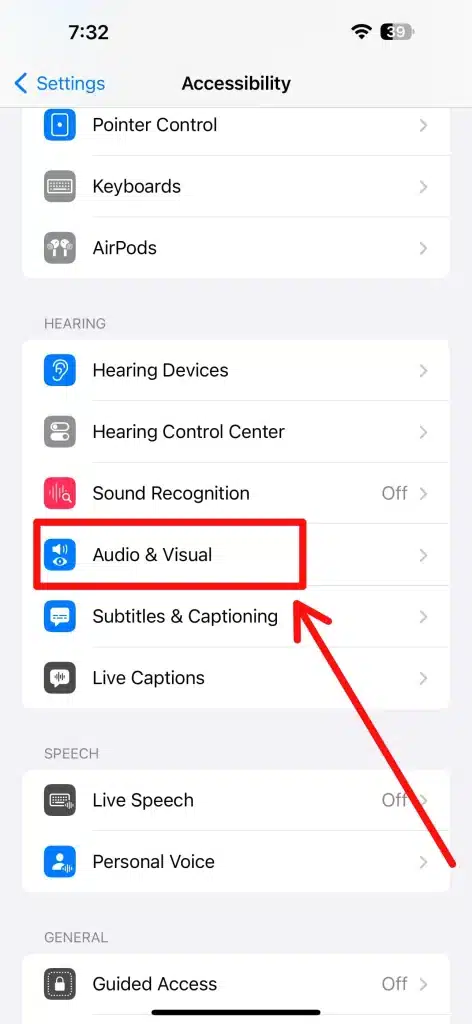
Step 2: Go to Audio/Visual
In the Accessibility menu, find and tap on Audio/Visual under the “Hearing” section.
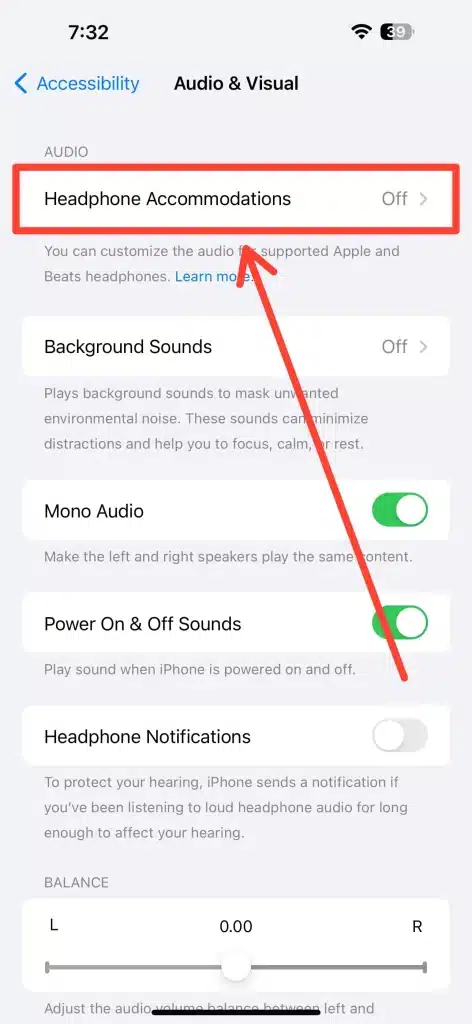
Step 3: Select Headphone Accommodations
In the Audio/Visual section, tap on Headphone Accommodations to customize your headphone audio.
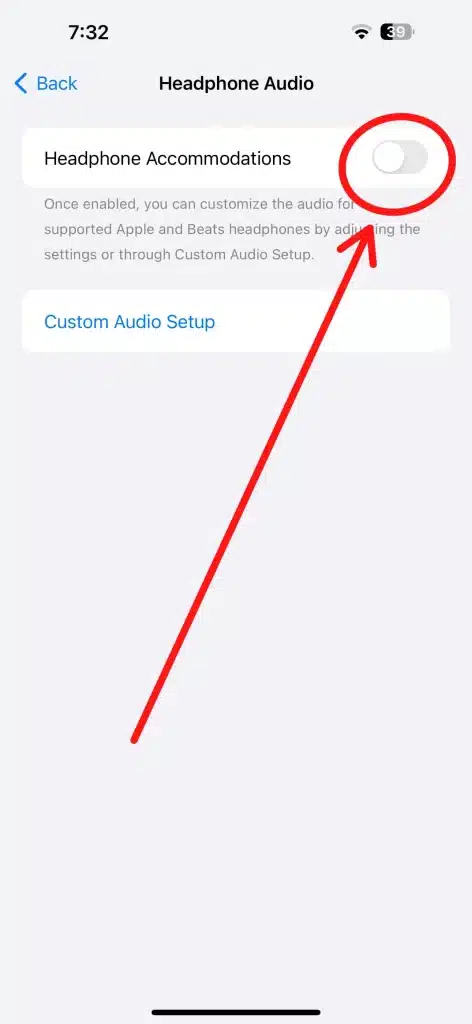
Step 4: Turn On Headphone Accommodations
Toggle on the Headphone Accommodations switch. This feature allows you to enhance and adjust the audio.
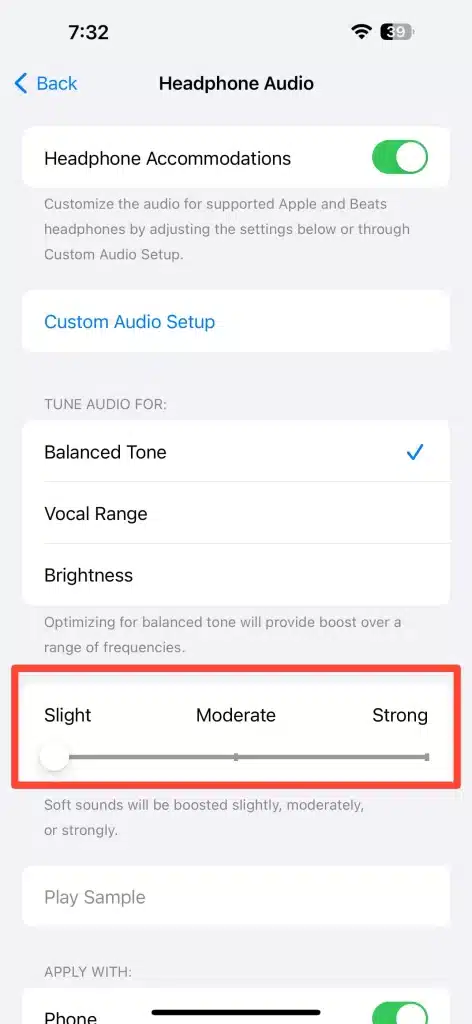
Step 5: Adjust the Audio Settings
Select an audio tuning option like Balanced Tone, Vocal Range, or Brightness. Use the slider at the bottom to increase the audio boost. Set it to Moderate or Strong for a noticeable volume increase.
Step 6: Choose Your Preferred Audio Tuning
Pick the best audio setting that suits you. For overall sound enhancement, select Balanced Tone. For clearer vocals, choose Vocal Range.
Pro Tip: Want a more personalized boost? Try the Custom Audio Setup option in the same menu. It’s like a quick hearing test that customizes the sound output based on what you hear best. Many people find their AirPods sound noticeably clearer and louder after this setup.
How to Calibrate AirPods for Louder Sound on iPhone
If your AirPods still aren’t hitting those high notes, they might need a little calibration. This process is super easy and doesn’t take long at all.
- Disconnect the AirPods from your iPhone by going to Settings > Bluetooth. Find your AirPods on the list, tap the i next to them, and select Forget This Device. Don’t worry; we’ll pair them again in a sec.
- Turn off Bluetooth on your iPhone temporarily. Just swipe down to open the Control Center and tap the Bluetooth icon.
- Now, play a song or video on your iPhone. You’ll notice there’s no sound coming out – that’s okay!
- While the song is still playing, turn the Bluetooth back on and reconnect your AirPods. Your iPhone and AirPods should now be calibrated, and you might find the volume is a lot louder!
It might sound a bit strange, but this little reset trick has helped a lot of people. Sometimes, the connection between your iPhone and AirPods just needs a fresh start to sync up properly.
Adjusting Sound Settings in Music Apps for Louder Audio
So, here’s something you might not have thought of: your music apps have their own volume settings. Yep, even if your phone volume is maxed out, the app itself might still be holding back on you.
Spotify:
Open the app, tap on Settings (the gear icon), and scroll down to Playback. You’ll find an option called Volume Level. Set this to Loud. It’s designed to balance out tracks, but if you set it to loud, it’ll push the volume up a bit.
Apple Music:
Go to Settings > Music on your iPhone and look for EQ. Set it to Late Night. Now, this might sound weird, but the “Late Night” setting actually compresses the dynamic range of the audio, which makes quieter sounds louder. It’s a quick hack that can really give your music a punch.
YouTube:
While watching a video, tap on the screen to bring up the playback controls, then adjust the volume slider. If you’re using Safari, check that the volume is maxed out in the Control Center too.
Lastly, if you’re using other music apps like Deezer, Amazon Music, or even VLC, they usually have their own sound settings or equalizers. It’s worth poking around in their settings to see if there’s an option to tweak the volume. A few small changes can make a huge difference!
How to Clean AirPods to Make Them Louder
If your AirPods aren’t sounding as loud as they used to, they might need a little TLC. Dirt, earwax, and dust can block the speakers and microphones, lowering the volume. Here’s a quick and easy cleaning routine to boost your AirPods’ sound quality.
1: Clean the Exterior
- Use a soft, lint-free cloth to gently wipe down the outside of your AirPods. This removes surface-level dirt and grime.
- Make sure you’re not using too much force just a light wipe will do!
2: Clean the Speaker Grills
- Dip a cotton swab in a tiny bit of rubbing alcohol. Be careful not to soak it; you only need a little!
- Gently clean around the speaker grills. Don’t push too hard, as you might push dirt further into the mesh. This step can instantly clear up muffled sound.
3: Clean the Microphones
- Grab a dry cotton swab or a soft toothbrush. Use it to gently brush around the mic openings. You’d be surprised how much sound gets blocked by debris here.
- A quick brush should do the trick; there’s no need to scrub.
4: Let Them Dry
- Leave your AirPods out to dry for a few minutes. It’s crucial to make sure no moisture remains before you put them back in the case or in your ears.
By following these simple cleaning steps, you’ll likely notice an immediate improvement in your AirPods’ volume and clarity. It’s like a mini spa day for your earbuds, and trust me, it’s worth it.
For over-ear headphones, it’s equally important to know How to Clean Headphone Pads to maintain sound quality and hygiene.
AirPods Pro Features for a Louder Audio Experience
If you’ve got the AirPods Pro and still feel like the volume isn’t where you want it to be, don’t worry! The AirPods Pro have a few nifty features that can really change your listening experience. Let’s dive into two key features: the Ear Tip Fit Test and Active Noise Cancellation (ANC). Both can make your AirPods sound fuller and louder.
How to Use the Ear Tip Fit Test for Better Volume
A lot of people don’t realize that the fit of the ear tips can impact sound quality. If the tips aren’t sealing properly, you’re probably losing sound. Fortunately, the AirPods Pro have a built-in Ear Tip Fit Test to help you get the perfect seal. Here’s how to do it:
- Open Bluetooth Settings:
- First, pop your AirPods Pro into your ears. Then, go to Settings > Bluetooth on your iPhone.
- Find your AirPods on the list and tap the “i” icon next to them.
- Run the Ear Tip Fit Test:
- Scroll down and select Ear Tip Fit Test. This will play a short sound to check the seal of the ear tips in your ears.
- Follow the on-screen instructions. If the fit isn’t quite right, it will prompt you to try a different size.
- Adjust Until You Find the Perfect Fit:
- Swap out the ear tips (the AirPods Pro come with three sizes) and run the test again. Finding the perfect fit may take a little trial and error, but it’s worth it!
- A good seal can dramatically improve sound quality and make your AirPods louder without adjusting the volume settings.
Turn On Active Noise Cancellation (ANC) for Louder Sound
Another game-changer is the Active Noise Cancellation feature. It reduces background noise, allowing you to hear your audio more clearly. Here’s how to enable it:
- Use the Control Center:
- Swipe down from the top-right corner of your iPhone to open the Control Center.
- Press and hold the volume slider until you see the Noise Control options. Then, tap on Noise Cancellation.
- Toggle with Force Sensors:
- You can also turn ANC on and off directly from your AirPods Pro. Just press and hold the force sensor on the stem of either AirPod until you hear a chime.
- Experience the Difference:
- With ANC enabled, you’ll notice that background noise fades away. This lets you keep the volume at a reasonable level while still enjoying louder, clearer sound.
Pro Tip:
Use Transparency Mode when you need to stay aware of your surroundings. Just press and hold the force sensor to toggle between ANC and Transparency Mode. While it won’t necessarily make your AirPods louder, it does give you more control over your sound environment.
By using these AirPods Pro features, you can make your audio experience both louder and clearer. It’s not always about cranking up the volume—sometimes, it’s about getting the most out of your device’s built-in tools!
Exploring Additional Audio Accessories for Enhanced AirPods Volume
So, you’ve tried adjusting the settings and even cleaning your AirPods, but you’re still craving a bit more volume? Don’t worry, you’re not out of options just yet! Accessories like silicone ear tips and ear hooks can make a surprising difference in boosting sound. Let’s break down how these tools can help and how to use them effectively.
Try Silicone Ear Tips for a Better Fit
A snug fit can do wonders for sound quality. If your AirPods don’t sit properly in your ears, you might be losing sound. Here’s how silicone ear tips can help:
- Create a Tight Seal: Silicone ear tips slip right over your AirPods and create a tighter seal inside your ear. This helps prevent sound leakage and amplifies the audio directly into your ears.
- Choose the Right Size: Many silicone ear tips come in different sizes. Start with a medium size and adjust from there. You want the tips to feel snug but not uncomfortable.
- Easy to Attach: Most silicone ear tips easily slip onto your AirPods. Simply stretch them over the speaker area and gently press to secure.
Pro Tip: If you’re using AirPods Pro, try swapping the included ear tips for third-party silicone ones that offer a variety of sizes and fits. A tighter seal can instantly make your AirPods sound louder.
Use Ear Hooks for Secure and Louder Sound
Ear hooks are another fantastic accessory if you’re constantly on the move and need your AirPods to stay put. They not only keep your AirPods secure but also position them for optimal sound. Here’s how to make the most of ear hooks:
- Wrap Around for a Secure Fit: Ear hooks wrap around the back of your ears, holding the AirPods in place. This positioning helps form a better seal, reducing sound loss and making the audio feel louder.
- Choose Flexible Materials: Look for ear hooks made of soft, flexible materials like silicone. This ensures comfort during long wear and prevents irritation.
- Quick Installation: Most ear hooks simply slide onto the stem of your AirPods. Once attached, fit them around your ears for a snug and secure setup.
Why These Accessories Work
- Reduce Sound Leakage: Both silicone ear tips and ear hooks help create a better seal, reducing the amount of sound that escapes. This means more of the audio goes directly into your ears, making it sound louder without having to actually increase the volume.
- Enhance Comfort: These accessories also make wearing AirPods for long periods more comfortable. A proper fit can improve the overall listening experience and make sure your AirPods stay put, whether you’re working out or just going about your day.
By adding these simple accessories, you can boost your AirPods’ volume and sound quality without touching any settings. It’s all about finding the right fit for your ears!
Advanced Software Hacks to Boost AirPods Volume
Okay, so we’ve tried adjusting settings, cleaning your AirPods, and even using accessories. But what if you’re still looking for that extra volume boost? Well, it might be time to explore a few software tricks that can help. These involve tweaking some settings on your device or using apps to give you that extra bit of loudness. Just keep in mind that with some of these, a little caution is a good idea we don’t want to damage your hearing or your AirPods!
Using Volume-Boosting Apps on iPhone and Android
First up, let’s talk about volume-boosting apps. If you’re using an iPhone or Android, there are apps designed to increase the audio output beyond the normal limits. But here’s the thing: not all these apps are created equal. Some work great, while others can mess up your sound quality or even harm your device’s speakers if pushed too far. So, let’s break it down a bit.
Find a Reliable App:
Head over to the App Store or Google Play Store and look for volume-boosting apps. Some popular options include “Volume Booster,” “Equalizer FX,” and “Boom.” Read the reviews before downloading to make sure you’re getting one that actually works and won’t mess up your sound.
Start Low and Go Slow:
When you first use these apps, don’t crank the volume all the way up. Start with a slight increase and test it out. Listen to a song or a podcast for a few minutes, and then decide if you need more. A gradual approach can prevent damage to both your AirPods and your ears.
Adjust In-App Settings:
Most volume-boosting apps have their own set of controls. Play around with the equalizer settings to enhance specific audio frequencies. Want more bass? Boost those lower frequencies. Need clearer vocals? Increase the mids. Small adjustments can often make a big difference without needing to push the volume too high.
Use Caution:
Now, here’s where I give you a little warning. Using these apps too aggressively can potentially damage your AirPods’ speakers. They’re not designed to handle extreme sound boosts, so always use them responsibly. Remember, the goal is to make your audio clearer, not to blow out your eardrums!
Customizing Bluetooth Settings for Louder Sound on Android
If you’re using an Android device, you’ve got some cool options to enhance your AirPods’ volume. Android’s settings allow for more customization than iOS, and with just a few tweaks, you can get a noticeable volume boost.
Enable Developer Options:
Here’s a fun little hack. To unlock some advanced audio settings, go to Settings > About Phone and tap on Build Number seven times. Yep, seven! This will enable Developer Options in your settings menu. Don’t worry; you’re not going to mess up your phone by doing this – it just gives you access to some hidden features.
Adjust Bluetooth Settings:
Now that you’ve got Developer Options enabled, go back to Settings and find Developer Options (it’ll usually be near the bottom of the list). Look for Disable Absolute Volume and turn it on. What this does is separate your phone’s volume controls from your AirPods, giving you more room to adjust both independently. Sometimes, this little tweak can make your AirPods sound noticeably louder.
Use Built-In Equalizers:
Many Android phones come with built-in equalizers or sound enhancements. Go to Settings > Sound & Vibration > Sound Effects (or something similar, depending on your phone). From here, you can adjust the EQ settings to enhance certain frequencies. Try boosting the treble and bass slightly – this can make your audio feel fuller and louder without needing to max out the volume.
Explore Other Sound Settings:
Some Android devices have advanced sound settings under Sound Quality or Audio Effects. These might include options like “Bass Boost” or “Surround Sound,” which can further enhance your listening experience. It’s worth exploring these options to find what works best for you.
Why These Software Hacks Work
So, you might be wondering, why do these tweaks make a difference? Well, a lot of it comes down to how audio signals are processed by your phone and AirPods. Apps and system settings essentially tell your device how to handle the audio output. By using volume boosters or tweaking Bluetooth settings, you’re changing the way your device sends sound to your AirPods, which can result in a louder and clearer experience.
That said, it’s always a good idea to be careful. Not every phone or AirPod model responds the same way to these changes, so test things out gradually. And if you start hearing distortion, that’s your cue to back off a bit.
Safety Considerations When Increasing AirPods Volume
It’s great to pump up the volume on your AirPods, but let’s not forget about your ears. After all, your hearing is precious! Before you go all in on these volume-boosting tricks, let’s talk about some simple safety measures to protect your ears from potential damage.
Follow the 60/60 Rule:
A great rule of thumb for safe listening is the 60/60 rule. This means listening at 60% of the maximum volume for no more than 60 minutes at a time. Afterward, give your ears a break for a few minutes. It’s tough to pause when you’re in the middle of a great song or podcast, but trust me, it will pay off in the long run.
Use Active Noise Cancellation (ANC):
If you have AirPods Pro, consider enabling Active Noise Cancellation (ANC). By blocking out background noise, ANC allows you to hear your music more clearly, so you don’t have to crank up the volume as much. In other words, it’s like getting louder sound without the risk of hearing damage!
Set Volume Limits on Your Device:
Did you know that you can actually set a volume limit on your iPhone or Android? Go to Settings > Sounds & Haptics > Headphone Safety on your iPhone, and turn on Reduce Loud Sounds. Similarly, on Android devices, look for options like Volume Limiter in the sound settings. This way, even if you accidentally turn up the volume too high, your device will automatically keep it at a safer level.
Listen for Distortion:
Whenever you notice any distortion or crackling in your AirPods, that’s your cue to turn down the volume. Distortion is a sign that you might be pushing your AirPods too hard, which isn’t good for your ears or the speakers. So, pay attention to how your AirPods sound and make adjustments as needed.
By keeping these tips in mind, you can enjoy your favorite tunes without putting your hearing at risk. After all, the goal is to have a louder and clearer listening experience, not to compromise your ear health!
Final Pro Tips: Get the Most Out of Your AirPods’ Sound
Now that we’ve covered the basics and safety tips, let’s dive into some final pro tips to maximize your AirPods’ volume and sound quality.
Try the Custom Audio Setup:
If you’re using an iPhone, you can take your listening experience up a notch by setting up a Custom Audio Profile. Go to Settings > Accessibility > Audio/Visual > Headphone Accommodations and select Custom Audio Setup. This feature plays a series of sounds to tailor the audio output specifically to your hearing preferences. In the end, you’ll notice that the audio feels much clearer and, yes, even louder!
Switch Out Silicone Ear Tips:
For AirPods Pro users, swapping out the default silicone ear tips for third-party ones can make a huge difference. Some ear tips create a better seal inside your ear, preventing sound leakage and making the audio feel fuller. It’s all about finding the right fit, so don’t be afraid to experiment with different sizes until you find the perfect one.
Use Transparency Mode Smartly:
While Active Noise Cancellation is great for quiet environments, Transparency Mode can also enhance your listening experience when you’re out and about. It lets in just enough background sound so you can stay aware of your surroundings without turning up the volume too high. This is especially useful when walking or running outside, where staying safe is a priority.
Clean Your AirPods Regularly:
We’ve mentioned cleaning already, but it’s worth repeating: a clean AirPod is a loud AirPod! Make it a habit to clean your AirPods and charging case regularly to ensure maximum sound output. It’s one of the simplest yet most effective ways to keep your AirPods performing at their best.
By incorporating these pro tips into your routine, you’ll be amazed at how much better and louder your AirPods can sound. And, with the right balance of volume and safety measures, you’ll enjoy your audio experience without any worries!
When to Seek Professional Assistance
Alright, so you’ve tried all the tips and tricks we’ve talked about: you’ve adjusted settings, cleaned your AirPods, and even played around with some volume hacks. But let’s say they’re still not getting as loud as they used to. It might be time to consider that something could be wrong under the hood. Don’t worry this happens to the best of us. There are a few signs that might indicate it’s time to get some professional help, whether it’s reaching out to Apple Support or visiting an Apple Store.
Identifying Hardware Problems with Your AirPods
Here’s the thing: AirPods are packed with tiny, sensitive components that can sometimes run into issues. Over time, physical wear and tear can affect the sound quality and volume. Here are some signs that might suggest your AirPods are dealing with a hardware issue:
- One AirPod Is Noticeably Quieter: If you’ve noticed that one AirPod is a lot quieter than the other—even after cleaning and adjusting the balance settings—there might be an internal hardware problem. It could be something with the speaker or a fault in the wiring inside the AirPod. When this happens, there’s not much you can do on your own to fix it.
- Distorted Sound at Low Volumes: Distortion is a big red flag. If your AirPods sound crackly or distorted even at lower volumes, it might be due to a speaker issue. This could happen if the AirPods were dropped, exposed to moisture, or just used a lot over time. While some cleaning can help with minor distortion, more serious cases usually require professional repair or replacement.
- Battery Issues: If your AirPods aren’t holding a charge for very long, that can also affect the volume. Low battery levels can sometimes cause a drop in sound quality. While the battery itself can’t be replaced, Apple Support can run diagnostics to see if that’s the root of the problem.
Steps to Take Before Contacting Apple Support
Now, before you go running to the Apple Store, there are a few last-ditch efforts you can try. Trust me, you’ll want to give these a shot because sometimes, even the pros will suggest these steps before anything else.
- Reset Your AirPods: This is like a “hard reset” for your earbuds. Put both AirPods in their case, then open the lid. Hold down the setup button on the back of the case for about 15 seconds, until the LED light flashes amber. After that, reconnect them to your devices. This can sometimes clear up weird software glitches affecting volume.
- Try a Different Device: If you have another phone, tablet, or computer handy, try pairing your AirPods with it. If the volume issues disappear when connected to a different device, the problem might be with your original device’s Bluetooth or audio settings.
- Check for Software Updates: Sometimes, a simple software update can fix all sorts of weird problems. Make sure your iPhone, iPad, or Mac has the latest software installed. To check, go to Settings > General > Software Update on your iPhone or iPad. You’d be surprised how often an update can clear up audio issues!
If you’re experiencing similar sound issues with other earbuds, it might help to learn How to Reset Tozo Earbuds before considering professional support.
When to Visit the Apple Store or Contact Apple Support
Alright, so if you’ve tried all the tricks in the book and nothing’s working, it’s probably time to get in touch with Apple Support. You can start by using the Apple Support app or visiting the Apple Support website. They might run you through some more troubleshooting steps (which you’ve probably already done), but if that doesn’t solve it, they’ll set up a repair or replacement.
Heading to the Apple Store? Make sure to book an appointment at the Genius Bar first. These spots can fill up fast, and you don’t want to show up just to be turned away. When you get there, explain what’s happening and let them know you’ve already tried some basic fixes. The more information you give them, the faster they can diagnose the issue.
Replacement Options: If your AirPods are still under warranty or covered by AppleCare+, you might be eligible for a free repair or replacement. If not, you’ll have to pay a fee, but sometimes getting fresh, fully-functioning AirPods is worth it.
FAQS: How to make your airpods louder
To make your AirPods louder on an iPhone, use the volume buttons, then go to Settings > Music and turn off Sound Check. You can also check Headphone Accommodations in Settings > Accessibility > Audio/Visual for extra sound tweaks.
On Android, first adjust the media volume slider. If it’s still not loud enough, go into Sound Settings to find the built-in equalizer or volume-boosting options. For advanced users, enable Developer Options (tap “Build Number” seven times) and disable Absolute Volume for more control.
If your AirPods are still quiet after cleaning, check the audio source. Make sure your device’s volume and the in-app volume (like Spotify or YouTube) are turned up. Also, go to Settings > Accessibility > Audio/Visual on iPhone and check the audio balance. If the left/right slider isn’t centered, it might be causing the imbalance in sound.
To use iPhone’s Accessibility settings to boost AirPods volume:
1. Go to Settings > Accessibility > Audio/Visual.
2. Select Headphone Accommodations and turn it on.
3. Use Custom Audio Setup to adjust sound enhancements, like boosting vocals. You can also use the Balance slider to adjust volume for each ear.
These settings are great for enhancing audio clarity, especially for podcasts or spoken content.
Yes, using volume-boosting apps can damage your AirPods if overused. These apps push audio output beyond normal limits, which might strain the speakers over time. To avoid damage, use these apps moderately and start with a low boost. If you notice distortion, turn the volume down to protect both your hearing and your AirPods.
Conclusion:
If your AirPods aren’t loud enough, don’t stress it happens! Start by checking your volume settings and giving your AirPods a good clean. You’d be surprised how much earwax can block sound. If you’re using AirPods Pro, definitely try out the Ear Tip Fit Test and turn on Noise Cancellation; it helps a lot. You can also mess around with the settings in your iPhone’s Accessibility menu or use a volume-boosting app on Android, but just don’t push things too far.
Now, if none of that does the trick, it might be time to reach out to Apple Support. Sometimes, it’s a hardware issue, and it’s best to let the pros handle it. And hey, while you’re at it, remember to listen safely. Try sticking to the 60/60 rule 60% volume for no more than 60 minutes at a time.


