

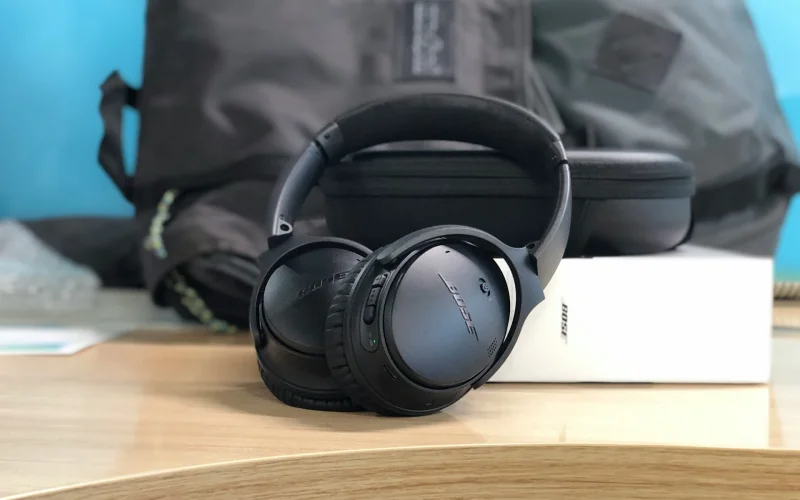
Worn-out cushions can ruin the comfort and sound of your favorite headphones. Knowing how to replace Bose ear pads is the quickest fix and it’s easier than you think. Whether you use the QC15, QC25, QC35, QC45, OE2, SoundLink, and Bose 700, this guide will show you exactly how to swap out your pads in minutes. Let’s dive in and bring your headphones back to life.
If you’re also using in-ear models like Bose earbuds, you’ll want to maintain those too. Here’s our full guide on how to clean Bose earbuds without damaging them.
Tools and Materials You’ll Need to Replace Bose Headphone Ear Pads
To replace Bose headphone ear pads, you’ll need a few basic tools: replacement cushions, a soft cloth or towel, your fingers or a plastic tool for removal, and optional adhesive strips or gloves. This setup works for most models, including the Bose QC15, QC25, QC35, QC45, SoundLink, and Bose 700.
Essential Tools for Replacing Bose Ear Pads
Use the checklist below to make sure you have everything ready before starting the replacement process:
- Replacement ear pads: Choose pads made for your exact model Bose QC35 ear pads won’t fit QC15 or Bose 700 headphones. For best results, look for OEM parts. However, high-quality third-party options also work well and are more budget-friendly.
- Soft cloth or towel: Place your headphones on a soft surface during the process to prevent scratches. A microfiber cloth or towel works best.
- Fingers or plastic prying tool: Most Bose ear pads snap off easily by hand. For tighter fits, a plastic prying tool helps remove the cushions without damaging the ear cups. Avoid sharp tools.
- Adhesive rings or backing strips: Some models especially newer ones like the QC45 and Bose 700 use adhesive backing to secure pads or scrims. If your replacement set includes these, have them ready before installation.
- Lint-free cloth or gloves (optional): While not essential, gloves help prevent fingerprints on the speaker mesh. A lint-free cloth is useful for a final wipe-down after installation.
Real-World Tip
Once you replace your Bose ear pads once, it becomes second nature. No special skills or tools are required it’s a simple, 5-minute fix that dramatically improves comfort and restores the feel of brand-new headphones.
Ready to install your new pads?
Check out the next section: [Step-by-Step Guide to Replacing Bose Ear Pads]
Or jump to your model-specific guide:
[Bose 700 Guide] – [QC15 and QC25] – [QC35 and QC45] – [Bose OE2 Guide] – [Bose SoundLink Guide]
How To Replace Bose Ear Pads(Works for Most Models)
To replace Bose ear pads, gently remove the old cushions, clean the ear cups, and install the new pads using snaps or adhesive strips. This process takes just a few minutes and works for most models including the Bose QC35, QC45, 700, SoundLink, and OE2.
Step-by-Step: Replacing Your Bose Ear Pads
1. Remove the old pads
Hold the ear cup in one hand and start peeling the pad off with your fingers. Work your way around the edges slowly. You’ll hear a soft pop as it detaches. If it’s really stuck, slide a plastic prying tool under the edge to help.
2. Clean the ear cups
Once the pads are off, check for leftover adhesive or debris. Wipe everything down with a clean, dry cloth so the new pads will stick or snap on properly.
3. Check the scrims
Look inside the ear cups. If there’s a mesh liner (called a scrim), check whether it needs replacing. Some replacement kits include new ones if yours do, match the “L” and “R” sides and gently press them into place. Be careful not to press on the speaker.
4. Position the new pads
Take your new ear pad and line it up with the shape of the ear cup. If there are tabs, match them to the cutouts. If you’re using adhesive, remove the backing strip and get it into position before pressing down.
5. Press to secure
For snap-in pads, press firmly around the outer edge until all the clips click into place. For adhesive pads, press evenly and hold for 20–30 seconds to make sure they stick well.
How to Replace Bose 700 Ear Pads
To replace Bose 700 ear pads, gently pull off the old cushions and remove the inner scrims. Align and attach the new scrims if included, then press the new pads onto the ear cups until they snap into place. This process takes about five minutes and restores comfort and sound quality.
Step-by-Step Guide: Replacing Bose 700 Ear Pads
- Remove the old ear pads
- Hold the ear cup firmly.
- Gently pull the edge of the pad away from the cup.
- Continue around the perimeter until all tabs release.
- Peel off the scrims
- Inside each cup, remove the circular fabric scrim.
- Start from the top edge and peel carefully.
- Avoid pressing on the speaker inside.
- Install new scrims (if provided)
- Check for “L” and “R” labels.
- Align and press the scrims inside the correct ear cup.
- Use light pressure around the edge do not press the center.
- Attach the new ear pads
- Line up the pad’s clips with the grooves in the ear cup.
- Press firmly around the edge until you hear the clips snap into place.
- Ensure all sides are secure.
- Test the fit
- Lightly tug each pad to confirm it’s locked in.
- Check for an even seal to maintain sound performance.
Own multiple headphone brands? If you’re also using Apple’s over-ear model, here’s a guide on how to clean AirPods Max ear cups safely and effectively.
Tips for Success
- Always use replacement pads made for Bose Noise Cancelling Headphones 700.
- Take your time aligning clips to avoid damaging the plastic.
- If your pads use adhesive backing, press firmly for 30 seconds to secure.
How to Replace Bose Ear Pads for QC15 and QC25
To replace Bose ear pads on QC15 and QC25 headphones, gently remove the old pads by pulling them off the ear cups, clean the surface, then align and snap the new ear pads into place. If your replacement kit includes scrims, replace those as well before securing the new cushions.
Step-by-Step: Bose QC15 and QC25 Ear Pad Replacement
Step 1: Remove old cushions safely
- Hold the ear cup steady.
- Use your fingers to gently peel the old pad away from the ear cup.
- Work around the entire edge until all tabs release.
Step 2: Remove and replace scrims (optional)
- Inside each ear cup is a fabric scrim protecting the speaker.
- If your replacement kit includes new scrims, gently peel off the old ones.
- Align the new scrims marked “L” and “R” and press lightly into place.
Step 3: Align and position new ear pads
- Take the new ear pad and align its shape with the ear cup.
- Ensure the mounting ring matches the internal clips on the headphones.
Step 4: Secure pads using snaps
- Press firmly around the edges until each tab snaps into place.
- You should hear or feel a slight click as each tab locks in.
Step 5: Check for proper fit
- Gently tug the pad to confirm it’s secure.
- Make sure the pad is seated evenly to maintain comfort and noise isolation.
Quick Tips for Replacing Bose QC15 and QC25 Ear Pads
- Use only pads designed specifically for the Bose QC15 or QC25 they are not interchangeable.
- Avoid using tools that could scratch or damage the ear cups.
- Take your time lining up the pads before pressing them in to prevent misalignment.
How to Replace Bose QC35 and QC45 Ear Pads
To replace Bose QC35 and QC45 ear pads, gently remove the old pads, clean the surface, and align the new cushions to the headphone frame. Then, press and snap them into place or secure with adhesive, depending on the model. This quick process restores comfort and improves sound isolation in just a few minutes.
Step-by-Step: Bose QC35 and QC45 Ear Pad Replacement
Step 1: Remove the old ear pads
- Hold one ear cup firmly in your hand.
- Gently pull the outer edge of the pad using your fingers.
- Work your way around the cushion until all tabs or adhesive strips release.
- If needed, use a plastic prying tool never meta to loosen stuck edges.
Step 2: Remove and replace the scrims (optional)
- Look inside each ear cup for the protective fabric layer (scrim).
- If your replacement set includes new scrims, peel off the old ones.
- Align and press the new scrims into place. Look for “L” and “R” labels.
Step 3: Align the new ear pads
- Match the shape of the new cushion to the ear cup frame.
- Make sure all tabs on the back of the pad line up with the headphone’s clip grooves.
Step 4: Attach and secure the ear pads
- For QC35: Press around the edges until all the tabs snap securely into place.
- For QC45: If adhesive-backed, remove the strip and press the cushion in place for 30 seconds.
Step 5: Check the fit
- Gently tug each pad to ensure it’s fully seated.
- Pads should feel tight and evenly aligned for maximum comfort and noise isolation.
Model-Specific Notes
- Bose QC35 Ear Pads: Typically use a clip-in tab system with no adhesive.
- Bose QC45 Ear Pads: Often come with adhesive strips be sure to press and hold for best results.
- Scrim replacement is optional unless damaged or if included with new pads.
Helpful Tips for a Smooth Bose Ear Pad Replacement
- Only use ear pads designed for your model: QC35 or QC45 they are not interchangeable.
- Avoid pressing directly on the speaker mesh when replacing scrims.
- Take your time aligning the pads before pressing to avoid misfit or gaps.
- Replacement improves sound quality, passive noise isolation, and comfort.
How to Replace Bose OE2 Ear Pads
To replace Bose OE2 ear pads, gently pull off the old cushions from the ear cups, remove any adhesive or scrims, then align and snap or press the new pads into place. This quick upgrade improves comfort, restores audio clarity, and extends the life of your headphones.
Step-by-Step: Bose OE2 Ear Pad Replacement
Step 1: Remove the old pads
- Hold the ear cup firmly.
- Use your fingers to pull the old cushion outward from the edges.
- Work around the ear pad until it comes free from all the mounting tabs.
Step 2: Clean the mounting area
- Use a soft, dry cloth to wipe away dust or old adhesive.
- Be gentle don’t touch the speaker directly.
Step 3: Check and replace the scrims (if included)
- Some OE2 pads come with a new inner fabric (scrim).
- If so, remove the old one and align the new scrim over the speaker area.
- Press lightly into place avoid applying pressure to the speaker itself.
Step 4: Attach the new ear pads
- Align the new pad’s clips or adhesive with the headphone’s mounting area.
- For snap-in pads: press along the edge until you feel each clip lock.
- For adhesive-backed pads: remove the backing and press firmly for 20–30 seconds.
Step 5: Confirm the fit
- Check that the pad is evenly attached all the way around.
- Lightly tug to make sure it’s secure before using your headphones.
OE2 Pad Replacement Tips
- Use only Bose OE2-compatible replacement pads other models may not align properly.
- If your kit includes adhesive rings, install them carefully before attaching the cushion.
- Take your time during alignment to avoid wrinkles or gaps that could affect fit and sound quality.
How to Replace Bose SoundLink Ear Pads
To replace Bose SoundLink ear pads, gently remove the old cushions by pulling them away from the ear cups, clean the surface, and press the new pads into place until they snap securely. Some versions may use adhesive rings. The process is quick and restores comfort and audio performance.
Step-by-Step: Bose SoundLink Ear Pad Replacement
Step 1: Remove the old ear pads
- Hold the ear cup firmly in one hand.
- Gently peel the edge of the ear pad away from the cup using your fingers.
- Work around the entire pad until it fully detaches.
- If needed, use a plastic prying tool to assist (avoid anything sharp).
Step 2: Clean the ear cup surface
- Use a soft, dry cloth to remove any dust, adhesive, or residue.
- Be careful not to touch the internal speaker or driver.
Step 3: Replace the scrims (optional)
- Inside each ear cup is a thin fabric lining called a scrim.
- If your new pads include replacement scrims, remove the old ones.
- Gently place the new scrims inside, aligning them with the ear cup shape.
Step 4: Align the new ear pads
- Position the new pad so that its clips or adhesive areas match the headphone’s mounting points.
- For adhesive-backed pads, remove the backing strip first.
Step 5: Secure the new pads
- Press firmly along the edges of the pad.
- For snap-on designs, you’ll hear a clicking sound as tabs lock into place.
- For adhesive pads, press and hold each pad in place for 30 seconds to ensure a firm seal.
Step 6: Check the fit
- Run your fingers around the cushion to ensure it’s seated evenly.
- Give it a gentle tug to confirm the attachment is secure.
SoundLink Model Tips
- Check compatibility: Bose SoundLink models vary (e.g., AE2, OE2, On-Ear) make sure your replacement pads are designed for your exact model.
- Do not interchange pads with QC or 700 series headphones they won’t fit properly.
- Third-party pads may differ slightly in shape, take extra care during alignment.
How to Choose the Right Replacement Ear Pads
If your Bose headphones are starting to feel uncomfortable or sound different, it’s probably time to replace the ear pads. But with so many options OEM or third-party, foam or leatherit’s easy to feel unsure. This guide will help you confidently choose the right replacement pads for your specific Bose model and needs.
OEM vs. Third-Party Bose Ear Pads: What’s the Difference?
When replacing your Bose ear pads, you’ll need to choose between OEM (Original Equipment Manufacturer) pads and third-party alternatives. Both can work well but they serve different priorities.
OEM Ear Pads (Original Bose Parts)
What they are: OEM pads are made by Bose, specifically designed for your headphone model—whether it’s the QC35, QC45, Bose 700, or older models like the QC15.
Pros:
- Guaranteed fit and finish
- Maintains original comfort and sound signature
- Designed to support Bose’s noise cancellation features
- High-quality materials tested by Bose
Cons:
- Usually more expensive
- Limited availability for discontinued models
- May take longer to ship from Bose directly
Third-Party Replacement Pads
What they are: These are made by other manufacturers, and are often designed to fit multiple Bose models like the QC25, SoundLink, or OE2.
Pros:
- More affordable (often 30–50% less)
- Wide range of materials: memory foam, protein leather, velour
- Often include scrims or adhesive rings in the package
- Easy to find online, especially for older or discontinued models
Cons:
- Quality and fit can vary
- May slightly change the sound or reduce noise cancellation
- Some don’t last as long as OEM cushions
For most users, a high-quality third-party brand is perfectly fine. But if you’re sensitive to sound performance or comfort, OEM is worth the extra cost especially for models like the Bose QC45 or 700 where noise cancellation is critical.
Bose Ear Pad Compatibility: Choosing the Right Fit by Model
Different Bose headphones require specific pads. Even if they look similar, the clips or adhesive rings may not align. Here’s a simple breakdown of which types work with which models:
| Bose Headphone Model | Compatible Replacement Type | Scrims Required? |
|---|---|---|
| QC15 | OEM or third-party with tab mounts | Optional |
| QC25 | OEM or third-party with snap tabs | Optional |
| QC35 / QC35 II | OEM or third-party (memory foam fits well) | Often included |
| QC45 | OEM or adhesive-backed third-party pads | Yes |
| Bose 700 | OEM or third-party (check for adhesive) | Yes |
| SoundLink AE2 | Third-party recommended | Sometimes |
| OE2 | Third-party (fit can be tricky) | Rarely included |
Always verify that the product description matches your exact Bose model. Pads that “fit most models” can sometimes be off by just enough to cause discomfort or poor sealing.
Where to Buy Bose Replacement Ear Pads
You can buy replacement ear pads from several sources, but not all are equal in terms of quality, price, or reliability.
Bose Official Store
- Ideal if you’re buying OEM pads
- Reliable product quality
- Recommended for current models like QC45 and Bose 700
- More expensive, and limited options for older models
Amazon
- Offers both OEM and third-party pads
- Easier to compare prices, brands, and customer reviews
- More availability for discontinued models (like QC15 and OE2)
- Check for verified reviews and avoid listings with unclear model support
Authorized Accessories Brands
Brands like Wicked Cushions and Brainwavz are known for making quality third-party pads tailored specifically for Bose headphones. Many include scrims and installation tools.
Choosing the right replacement ear pads for your Bose headphones comes down to what matters most to you cost, comfort, sound quality, or durability. If you’re looking for an exact match and top-tier materials, OEM is the safer choice. If you’re on a budget or using an older model, high-rated third-party pads offer great value.
Signs It’s Time to Replace Your Ear Cushions
You know that feeling when your favorite pair of headphones doesn’t quite sound or feel the same anymore? If your Bose headphones have been around for a while, chances are it’s not the tech failing you. It’s probably your ear cushions.
I’ve replaced more than a few pads over the years on models like the QC15, QC35, and even the newer Bose 700 and I can tell you, it makes a huge difference. Here’s how to know when it’s time.
Earwax and debris can impact sound quality in any type of headphones. If you use AirPods too, here’s a quick guide on how to clean earwax from AirPods without damaging them.
1. They’re Falling Apart (Literally)
Let’s start with the obvious. If you see cracks, peeling, or flakes of the cushion material coming off every time you use your headphones, that’s your first sign. This kind of wear is common with age and regular use, especially if you wear them on long commutes or during workouts.
Worn-out cushions don’t just look bad they also affect how your headphones fit. Once the seal around your ears is compromised, sound starts leaking, and noise cancellation becomes less effective.
2. Your Music Sounds Flat or Distant
If your music starts sounding muffled or just “off,” don’t panic. It doesn’t always mean your headphones are dying. Ear cushions play a bigger role in sound than most people realize. They help create a seal that affects everything from bass to noise isolation.
When the pads lose their shape or compress too much, you might notice:
- A drop in bass
- Less clarity in vocals
- External noise leaking in more than usual
It’s subtle at first but once you replace them, you’ll immediately hear the difference.
Over time, worn-out ear pads can reduce the seal around your ears, weakening the bass response. If you’re after that rich, immersive low-end, check out our list of the best bass headphones that still hit hard.
3. They’re Starting to Smell… Off
This one’s not as fun to talk about, but it’s real. If you’ve had your headphones for a while and use them regularly, the cushions absorb sweat, skin oils, and dust. Over time, they can start to smell not terribly, but just enough to notice.
And let’s be honest: no one wants to wear something that feels unhygienic on their head.
Some signs it’s time to swap for fresh cushions:
- Lingering odor that doesn’t go away after cleaning
- Discoloration or dark spots from sweat
- Skin irritation or itching after extended use
So, When Should You Replace Them?
As a general rule, replacing your Bose ear pads every 12 to 18 months is a smart move. But if you’re using them daily, or in humid conditions, it could be sooner. Trust your senses if they look worn, sound different, or feel uncomfortable, it’s time.
And the good news? It’s an easy fix. You don’t need tools, you don’t need experience, and once you’ve done it once, it only takes a few minutes next time.
After replacing your ear pads, if something still feels off like connection issues or sound quality try this quick fix on how to reset Bose headphones to restore factory settings.
Before You Go
If any of this sounds familiar, don’t wait until your headphones are unusable. Replacing your Bose ear pads is one of the simplest ways to breathe new life into your headphones and you’ll feel the difference right away.
Troubleshooting & Common Mistakes When Replacing Bose Ear Pads
So you’ve followed the guide, installed your new ear pads, and something just feels… off? You’re not alone. Even with a simple DIY task like this, a few things can go sideways. I’ve helped friends and readers fix these exact issues so if you hit a snag, here’s how to handle it without starting over.
Pad Doesn’t Snap Into Place? Here’s What to Do
If your new Bose ear pads aren’t clicking in or feel loose, don’t force it. This usually comes down to alignment or pressure placement not a faulty pad.
Here’s what I recommend:
- Double-check alignment: Make sure the tabs or notches on the back of the pad are lined up with the slots inside the ear cup. Some models, like the QC35 or SoundLink, have very specific groove placements. Even a slight misalignment can prevent it from locking in.
- Apply even pressure: Don’t press just one side. Work your way around the pad in a circular motion, pressing firmly with your fingers along the outer edge. You should hear a subtle “click” as each tab engages.
- Don’t use tools: If you’re tempted to reach for a screwdriver don’t. Using sharp objects can bend the plastic or damage the mounting ring. Stick to your hands or a soft plastic prying tool, if absolutely necessary.
If it still won’t snap in after all that, check that the pad is compatible with your specific model. QC15 pads, for example, won’t fit on QC25s even if they look similar.
Misaligned Scrim? How to Fix It Without Damaging Anything
The scrim (that thin fabric inside the ear cup) helps protect the speaker and preserve sound quality. If you installed a new one and it’s not centered or if it’s bubbling up it’s worth fixing. But you’ll want to do it gently.
Here’s how to reposition it without damaging the speaker:
- Peel it up slowly: Start from one edge and gently lift the scrim without poking or pressing into the speaker grill. Avoid using your fingernails; use a soft cloth or glove if needed.
- Realign using tweezers or fingertips: Carefully place it back down, smoothing from the center outward. Check for “L” and “R” labels so you don’t install them in reverse.
- Don’t press the middle: Scrims are delicate and sit directly on top of sensitive parts. Always press the edges, not the center.
If it’s too sticky or wrinkled, you might be better off replacing it again most ear pad kits include a spare set.
Earcup Rattling After Install? It Might Be One of These Things
If you hear a slight rattle or buzzing sound after installing your new ear pads, don’t panic it’s usually not serious.
Common causes include:
- Loose clips or tabs: A clip might not be fully seated. Press firmly around the entire ear pad, especially near the bottom and top edges.
- Trapped debris or adhesive: If any leftover adhesive or tiny debris got between the ear pad and the ear cup, it can cause movement when the headphones vibrate. Remove the pad and wipe the surface clean before reinstalling.
- Misaligned scrim: A wrinkled scrim can vibrate slightly against the speaker when audio is playing. Re-smoothing or replacing it can fix the issue.
If the rattling continues after trying all of the above, give the headphones a gentle shake to see if something is loose inside. If so, it’s worth checking with Bose support just in case it’s unrelated to the ear pads.
Replacing Bose ear pads is simple but small missteps can affect how your headphones feel and sound. Don’t worry if things don’t feel perfect on the first try. Reinstalling takes just a few minutes, and with a bit of patience, you’ll get that snug, quiet, like-new fit back.
FAQs:
Can I use third-party ear pads on Bose headphones?
Yes, you can use third-party ear pads on Bose headphones as long as they are designed to fit your specific model.
Most third-party pads work well with popular Bose models like QC35, QC25, and SoundLink. They’re often more affordable than OEM pads, but may differ slightly in fit, comfort, or sound isolation. Always check compatibility before buying.
How often should I replace my Bose ear cushions?
You should replace your Bose ear cushions every 12 to 18 months, depending on usage.
If you use your headphones daily or in humid environments, the pads may wear out faster. Common signs include peeling, loss of comfort, and reduced sound quality. Replacing them regularly helps maintain the seal and overall performance.
Are Bose replacement ear pads covered under warranty?
Bose replacement ear pads are generally not covered under warranty, as they are considered wear-and-tear items.
However, if your cushions are defective shortly after purchase, Bose may offer a courtesy replacement. It’s best to contact customer support with your serial number and purchase details.
What if I can’t identify my Bose headphone model?
If you can’t identify your Bose headphone model, check under the headband or inside the ear cup for a serial number or label.
You can enter this number on the official Bose support site to find your exact model. Alternatively, compare your headphone’s shape and features with listings online or ask in audio forums with a photo.
Is it safe to clean or reuse old Bose ear pads?
Yes, it’s safe to clean old Bose ear pads using a soft cloth and mild soap, but reusing them long-term isn’t ideal.
Over time, pads absorb sweat, oil, and dust, which affects comfort and sound quality. If the cushions are cracked, deformed, or smelly even after cleaning it’s best to replace them for hygiene and performance reasons.
If you’re using your Bose headphones during workouts, sweat can break down the ear pads faster. You might want to explore the best gym headphones designed to handle heavy sweat and movement.
Conclusion:
Replacing your Bose ear pads is one of the easiest upgrades you can make and it’s worth every second. Whether you’re using the QuietComfort series, SoundLink, or the latest Bose 700, fresh ear cushions instantly improve comfort, restore sound quality, and extend the life of your headphones.
You don’t need tools, technical skills, or a repair shop. Just a few minutes, the right pads, and a guide like this one and you’re good to go.
Before you buy, make sure you choose the correct pads for your model and follow each step carefully. And if something doesn’t feel right after install, check the Troubleshooting & FAQ sections to get back on track quickly.